Generation of Sample Site Locations [sp package for R]
Aug 15, 2008 metroadminPremise
Setting up sampling designs is a non-trivial aspect to any field experiment that includes a spatial component. The sp package for R provides a simple framework for generating point sampling schemes based on region-defining features (lines or polygons) and a sampling type (regular spacing, non-aligned, random, random-stratified, hexagonal grid, etc.). The rgdal package provides a set of functions for importing/exporting common vector data formats. This example demonstrates simple import/export, iterating over sp objects, and reconstituting new objects from lists of objects. A more complex sampling scheme is demonstrated here.
1. Setup the environment, load some sample polygons, and tryout the spsample() function.
# load required packages
library(sp)
library(rgdal)

# read data:
# note the funky syntax
# note that this should have a REAL projection defined
# an incorrect definition may result in an error from readOGR
x <- readOGR('polys/polys.shp', layer='polys')

# spsample will not sample each polygon, rather it works on the union of polys
# try it:
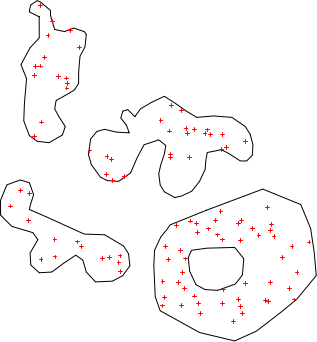
plot(x) ; points(spsample(x, n=100, type='random'), col='red', pch=3, cex=0.5)

Sampling with sample example 1
2. Iterate through all polygons in our original dataset, generating approximately 100 sample points within each polygon. Note that we use sapply() it iterate through the list of polygons, and do.call('rbind', ...) to 'stack' the list elements back into a single SpatialPoints object.
# hexagonal grid from lower-left corner
s <- sapply(slot(x, 'polygons'), function(i) spsample(i, n=100, type='hexagonal', offset=c(0,0)))

# we now have a list of SpatialPoints objects, one entry per polygon of original data
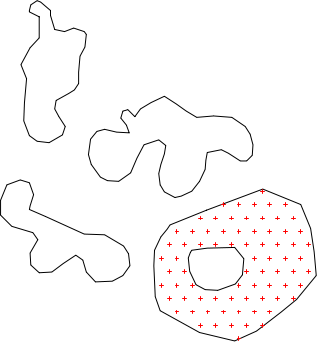
plot(x) ; points(s[[4]], col='red', pch=3, cex=.5)

# stack into a single SpatialPoints object
s.merged <- do.call('rbind', s)

Sampling with sample example 2
3. Now that the sample points for each polygon have been merged into a single SpatialPoints object, we need to attach a dataframe with the ID associating each sample point with its parent polygon. Attaching this data will "promote" the SpatialPoints object to a SpatialPointsDataFrame object.
# add an id, based on source polygon:
#
# extract the original IDs
ids <- sapply(slot(x, 'polygons'), function(i) slot(i, 'ID'))

# determine the number of ACTUAL sample points generated for each poly
npts <- sapply(s, function(i) nrow(i@coords))

# generate a reconstituted vector of point IDs
pt_id <- rep(ids, npts)

# promote to SpatialPointsDataFrame
s.final <- SpatialPointsDataFrame(s.merged, data=data.frame(poly_id=pt_id))

# check:
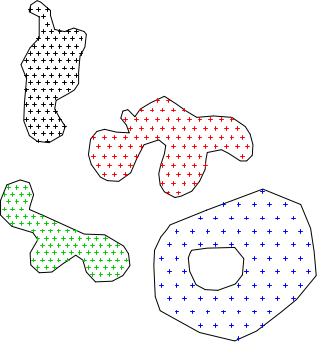
plot(x) ; points(s.final, col=s.final$poly_id, pch=3, cex=0.5)

Sampling with spsample example 3
4. Copy over the spatial reference system data from the polygons object, and save sample points to a new shapefile. Note that you can only write to a shapefile if the object in question is a SpatialPointsDataFrame object.
# copy source data spatial reference system to new object
s.final@proj4string <- x@proj4string

# write out to new file
writeOGR(s.final, dsn='polys/', layer='rnd_pts', driver='ESRI Shapefile')
Links:
Customizing Maps in R: spplot() and latticeExtra functions
Working with Spatial Data
Ordinary Kriging Example: GRASS-R Bindings
Software
- General Purpose Programming with Scripting Languages
- LaTeX Tips and Tricks
- PostGIS: Spatially enabled Relational Database Sytem
- PROJ: forward and reverse geographic projections
- GDAL and OGR: geodata conversion and re-projection tools
- R: advanced statistical package
- Access Data Stored in a Postgresql Database
- Additive Time Series Decomposition in R: Soil Moisture and Temperature Data
- Aggregating SSURGO Data in R
- Cluster Analysis 1: finding groups in a randomly generated 2-dimensional dataset
- Color Functions
- Comparison of Slope and Intercept Terms for Multi-Level Model
- Comparison of Slope and Intercept Terms for Multi-Level Model II: Using Contrasts
- Creating a Custom Panel Function (R - Lattice Graphics)
- Customized Scatterplot Ideas
- Estimating Missing Data with aregImpute() {R}
- Exploration of Multivariate Data
- Interactive 3D plots with the rgl package
- Making Soil Property vs. Depth Plots
- Numerical Integration/Differentiation in R: FTIR Spectra
- Plotting XRD (X-Ray Diffraction) Data
- Using lm() and predict() to apply a standard curve to Analytical Data
- Working with Spatial Data
- Customizing Maps in R: spplot() and latticeExtra functions
- Converting Alpha-Shapes into SP Objects
- Some Ideas on Interpolation of Categorical Data
- Visual Interpretation of Principal Coordinates (of) Neighbor Matrices (PCNM)
- Visualizing Random Fields and Select Components of Spatial Autocorrelation
- Generation of Sample Site Locations [sp package for R]
- Target Practice and Spatial Point Process Models
- Ordinary Kriging Example: GRASS-R Bindings
- Point-process modelling with the sp and spatstat packages
- Simple Map Creation
- Comparison of PSA Results: Pipette vs. Laser Granulometer
- GRASS GIS: raster, vector, and imagery analysis
- Generic Mapping Tools: high quality map production

